The Step-by-Step Process of Asphalt Paving
Asphalt paving involves several key stages, including site preparation, excavation, base grading, asphalt application, and compaction. Each step plays a critical role in securing a strong, long-lasting surface that can withstand heavy use and environmental conditions. Proper execution of these phases helps property owners achieve a smooth, durable finish that offers both functionality and visual appeal.
Table of Contents
- Understanding the Importance of a Structured Paving Process
- Step 1: Site Inspection and Planning
- Step 2: Clearing and Excavation
- Step 3: Grading and Base Preparation
- Step 4: Applying the Binder and Surface Layers
- Step 5: Compaction and Finishing Touches
Understanding the Importance of a Structured Paving Process
Asphalt paving may look like a straightforward task, but it involves a carefully planned sequence of steps to secure lasting results. Whether it’s for a residential driveway or a commercial parking lot, skipping or rushing any phase can lead to premature wear, cracking, or uneven surfaces.
The process begins with assessing the area and creating a plan that considers drainage, usage, and environmental conditions. Then comes clearing away existing materials, grading the base, and laying down fresh asphalt in layers. Each stage plays a role in building a surface that can handle weight, weather, and time.
If you’re considering a paving project in Calgary, connecting with experienced asphalt paving contractors secures you get quality work that aligns with local standards and lasts for years to come.
Step 1: Site Inspection and Planning
Before any physical work begins, a thorough site inspection is essential. This initial phase involves evaluating the existing surface, assessing drainage patterns, and identifying any potential challenges such as underground utilities or unstable soil.
During planning, professionals measure the area and determine how much material will be needed. They also consider the intended use of the pavement — whether it’s for light residential traffic or heavy commercial vehicles — which influences the thickness and composition of the asphalt layers.
Proper planning helps avoid costly mistakes later on. It secures that the new pavement will have the right slope for water runoff, reducing the risk of cracks and potholes caused by standing water. In regions with harsh weather, like Calgary, this step is especially important to improve long-term durability.
This stage sets the foundation for a successful paving project, making it one of the most critical steps in the entire process.
Step 2: Clearing and Excavation
Once planning is complete, the next step is preparing the site by clearing away existing pavement, vegetation, and debris. This phase guarantees a clean, stable surface for the new asphalt to bond properly.
Clearing involves removing any obstacles such as grass, topsoil, old concrete, or damaged asphalt. Depending on the project, this can be done using hand tools, small machinery, or heavy equipment like excavators and skid steers.
After clearing, excavation begins. Workers dig down to the appropriate depth based on the planned thickness of the new pavement layers. The depth is determined by factors like expected traffic load and local climate conditions. In Calgary, where freeze-thaw cycles are common, proper excavation helps prevent future damage caused by ground movement.
Once the area is dug out, the subgrade — the layer of soil beneath the pavement — is compacted to provide a firm, level base. If the soil is unstable or has poor drainage, it may be replaced with granular material to improve support and longevity.
This stage is crucial because a well-prepared base directly affects how long the pavement will last and how well it handles temperature changes and moisture.
Step 3: Grading and Base Preparation
After excavation, the next critical step is grading and base preparation. This stage secures the pavement will have a stable, level foundation that supports even weight distribution and proper drainage.
Grading involves shaping the subgrade to the correct slope and elevation. The goal is to create a smooth, uniform surface that allows water to drain away from the paved area. Poor grading can lead to puddling, which weakens asphalt over time — especially in climates with frequent rain or snowmelt.
Once the subgrade is properly shaped, a layer of granular material — typically crushed gravel or stone — is added. This base layer provides additional support, helps with load distribution, and improves drainage beneath the asphalt.
The base material is then compacted using heavy rollers to make sure it’s dense and firm. Proper compaction is essential because any settling or shifting in the base can cause cracks or uneven surfaces in the finished pavement.
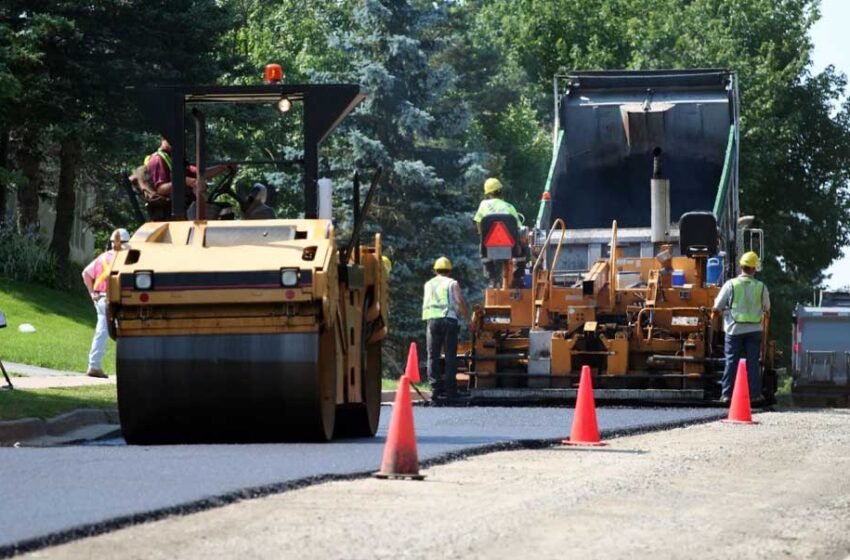
Step 4: Applying the Binder and Surface Layers

With the base properly prepared and compacted, it’s time to lay down the asphalt. This step typically involves applying two main layers: the binder course and the wearing course (or top layer).
The Binder Course
The first layer, known as the binder course, is made of a thicker, more durable asphalt mix with larger aggregates. It’s spread evenly over the prepared base using a paving machine. This layer provides structural strength and helps bond the surface to the foundation.
Workers use a screed — an adjustable plate on the paving machine — to set the thickness and smooth out the material as it’s laid down. The temperature of the asphalt at this stage is usually around 150°C, which allows it to be worked smoothly before it starts to cool and harden.
The Wearing Course
Once the binder layer is in place, the wearing course is applied on top. This second layer has a finer mix with smaller stones, giving the pavement a smoother finish that’s both visually appealing and safe for vehicle tires.
This final layer is also where the pavement gets its clean edges and uniform texture. Workers carefully check the grade and slope one last time to secure proper water runoff and a consistent appearance across the entire paved area.
Step 5: Compaction and Finishing Touches
Once the asphalt layers are laid, the next critical step is compaction. This process makes sure the pavement is dense, smooth, and durable by pressing the hot asphalt tightly together using heavy rollers.
Rolling in Layers
Compaction typically begins immediately after the asphalt is placed while the material is still hot and workable. Workers use three types of rollers in sequence:
- Breakdown roller: A heavy steel drum roller that provides initial compaction and settles the asphalt into place.
- Intermediate roller: A rubber-tired or vibratory roller used to further compress the material and even out any surface irregularities.
- Finish roller: A smaller steel drum roller that gives the final smooth finish, securing a uniform appearance and proper texture.
Rolling is done in overlapping passes to avoid missed spots, and workers monitor temperature closely — rolling must be completed before the asphalt cools below 90°C for best results.
Final Edges and Seams
Along curbs, walls, or existing pavement, hand tools and small plate compactors are used to shape and press the edges for a clean, finished look. Any seams between paving sections are carefully blended to create a seamless surface.
Proper compaction is essential — under-compacted asphalt can lead to premature cracking, water infiltration, and reduced lifespan. In Calgary’s climate, where seasonal shifts put added stress on pavement, this step plays a key role in long-term performance.
Final Thoughts: A Well-Executed Paving Process Makes All the Difference
Asphalt paving is a multi-step process that requires planning, precision, and professional expertise. From the initial site inspection to the final compaction, each phase contributes to the strength, durability, and longevity of the pavement.
Taking the time to follow best practices — especially in climates like Calgary’s — secures that surfaces can withstand heavy use, temperature fluctuations, and moisture without deteriorating prematurely.